19Dec
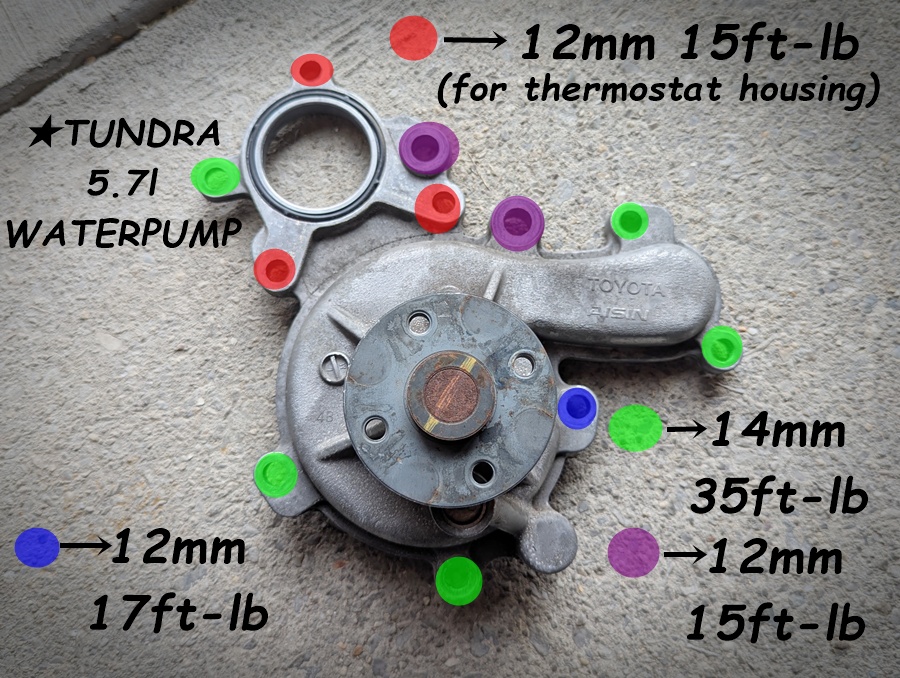
リクエストがありましたので、タンドラ3UR-FEエンジンのウォーターポンプ周りの交換メモをUPしておきます。
200系ランクルの1UR-FEもよく似ているらしいので、応用が利くのではないかと思います。
交換部品と推奨交換時期の目安は以下の通りですが、まあざっくり20万kmくらいでしょうか。
I’m sharing a maintenance memo for the Tundra’s 5.7l 3UR-FE engine water pump replacement.
This should also apply to the 4.6l 1UR-FE engine, as the structures are very similar.
The following are the recommended replacement intervals.
ドライブベルト Serpentine Belt 60,000〜100,000 mile
ベルトテンショナー Tensionar 100,000〜150,000 mile
アイドラプーリー Idler Pulley 80,000〜120,000 mile
ウォーターポンプ Water Pump 100,000〜150,000 mile
サーモスタット Thermostat 100,000〜150,000 mile
クーラント Coolant 初回100,000mile/以降50,000mile
ラジエーターキャップ Radiator Cap 80,000〜120,000 mile
Step 1: Draining the Coolant
順番としてはまずクーラントを抜きます。
手順は以下の動画を参考に、まずドレンからラジエーター内のLLCを排出。
さらにエンジン内部からもチューブを使って抜きますが、運転席側は抜かない方が良いみたいです。
(エア噛みが起こりやすいらしい)
First, drain the coolant.
Start by draining the radiator from the drain plug.
Next, drain the engine block using a tube.
Note: It is advised not to drain from the driver’s side block drain, as it is known to cause stubborn air pockets in the system.
Step 2: Removal
次にファンを取り除いてからベルトを外し、各交換部品を外しにかかります。
コツはとにかく視界と作業スペースをクリアにする事で、邪魔だと思った配線やパイプ類は、動画では解説されていなくても外すのをお勧めします。
またパイプを抜くのにホースリムーバーがあると便利です。
Remove the cooling fan, then the belt, and proceed to the individual components.
The key to a smooth job is clearing your line of sight and workspace.
Even if not mentioned in tutorial videos, I highly recommend removing any wiring or pipes that get in your way.
A hose remover tool is extremely helpful for stubborn pipes.
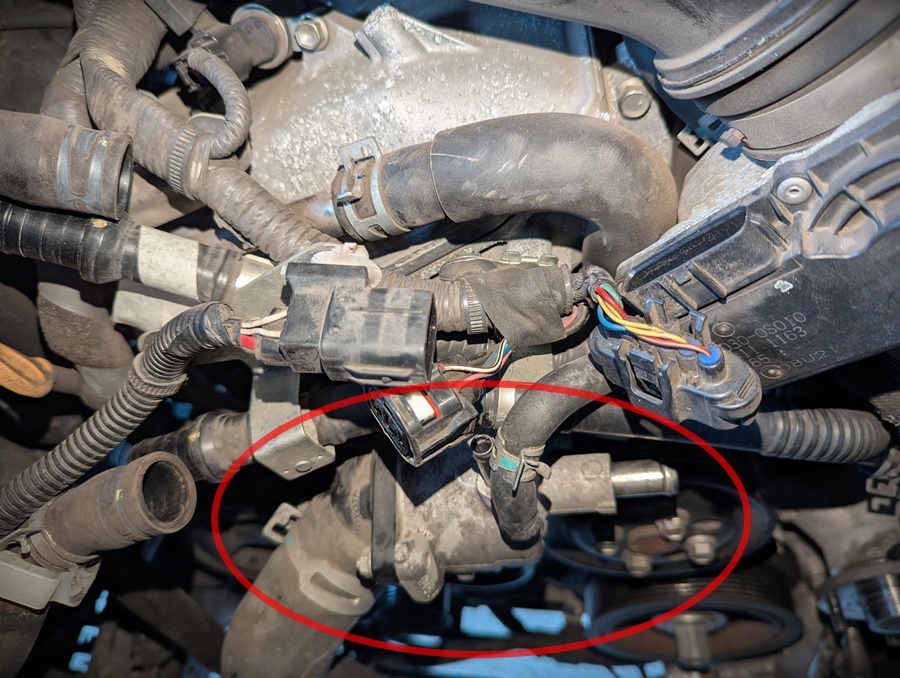
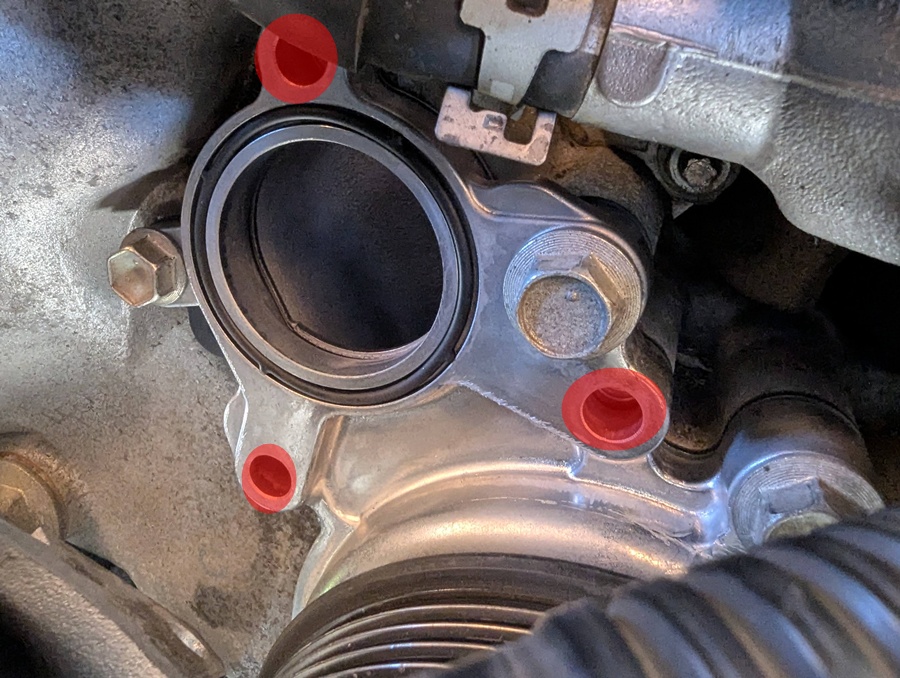
Step 3: Thermostat Housing
上の動画では簡単そうに外していますが、一番わかりにくいのがサーモスタットのハウジング(した写真の赤丸)の外し方。
The trickiest part is removing the thermostat housing.
(In the red circle below)
3本の12mmボルトでウォーターポンプに共締めされているので、見にくいですが頑張って探しましょう。
It is secured to the water pump by three 12mm bolts.
They can be hard to see, so take your time to locate them.
STEP4 : Installing the Waterpump
あとはウォーターポンプ本体を外して新品に付け替えますが、ガスケットの接触面はしっかりと掃除しましょう。
ボルトの締め付けトルクも重要なので、ここはしっかりとトルクレンチを使って下さい。
When installing the new water pump, ensure the gasket contact surfaces are perfectly clean.
Using a torque wrench is critical here—do not skip this to ensure a proper seal.
サーモスタットハウジングまで固定し終わったら、次はそこについているサーモスタットを交換。
これはそこまでややこしくないと思います。
After the pump is in, replace the thermostat inside the housing (this part is relatively straightforward).
Step 5: Reassembly & Belt Drive
あとはパイプ類を元に戻してから、テンショナーとプーリー、ベルトを交換します。
ちなみにテンショナーが奥にあって緩めるのが大変なので、下の動画で紹介されている専用工具はお勧めです。
Reinstall the pipes, then replace the tensioner, pulleys, and the belt.
Note: The tensioner is tucked away and can be difficult to loosen.
I highly recommend using the specialty tensioner tool mentioned in the video.
Step 6: Refilling & Air Bleeding
最後はファンを戻してから、トヨタ用のピンクのクーラントを補充します。
量は大体3ガロン(12l)弱で、ファンネルを使って入れましょう。
ヒーターHOTでアイドリングしながら、ファンネル内の液面を切らさないようにエア抜きをしたら終了です!
Finally, reinstall the fan and refill the system with Toyota Pink Super Long Life Coolant (SLLC).
You will need just under 3 gallons (approx. 12 liters).
Use a spill-free funnel for the refill.
Turn the heater to “HOT” and idle the engine.
Keep an eye on the fluid level in the funnel and continue bleeding the air until bubbles stop surfacing. Done!

関連記事
-

:[GARMIN] ライブスコープ(LVS62)&GPSMAP売ります
2025.06.25
-

Bassmaster公式・裏技集
2023.04.05
-

[’24バスマスターElite#8@シャンプレインDay3] エリート界の”法廷弁護士”、エドワード・ログランが優勝に王手!
2024.08.12
-

’25B.A.S.S. NATIONスケジュール発表!
2024.11.15
コメント
この記事へのトラックバックはありません。

この記事へのコメントはありません。